Building a chat app using Telepat
This tutorial will walk you through the most important parts of using Telepat to build a simple, realtime chat, with a bonus task management feature. You'll learn how to use Telepat to implement:
- a multi-user, 1-to-1, realtime chat
- allowing Facebook login
- with typing indicators
- with delivered/seen receipts
- with badges for unread messages from other threads
- with realtime tasks, that users can assign, complete and delete
The app source code is available on GitHub, and you can also see it in action in this demo instance we've set up. It's plain JavaScript, depends on jQuery for DOM manipulation, and you should be familiar with Gulp, Bower and Stylus to build or modify the project.
While this is a webapp, implemented using the Telepat JavaScript SDK, implementations look similar for native apps, using the iOS SDK and the Android SDK.
The main topics this tutorial will be covering are:
- Getting started with the server components
- Setting up your app
- Connecting Telepat
- Authenticating users
- Creating subscriptions and responding to updates
The server components
You have two options for this part:
- Roll your own. See the install guide to deploy locally or on your servers;
- Signup for a free cloud instance on the Telepat homepage.
Structuring the data
Messages
The first kind of object we want to have in our app is the message. A message object should represent a single text message, sent from one user to another. We should also store some information about the message being delivered and seen.
The structure of a message object
| Key name | Type | Description |
|---|---|---|
| received | boolean | True if recipient has received the message |
| recipient_id | user | The user id of the recepient of the message |
| seen | boolean | True if recipient has seen the message |
| text | string | The text of the message |
Chatrooms
We also need to implement the typing indicator functionality. Let's create some other objects, that the two participants to a chat can both read and write, so they can communicate with each other. We'll call these chatrooms.
The structure of a chatroom object
| Key name | Type | Description |
|---|---|---|
| participant_1 | user | The user id of one of the participants |
| participant_1 | user | The user id of the other participant |
| recipient_is_typing | boolean | True if recipient is currently typing |
| sender_is_typing | boolean | True if sender is currently typing |
We'll also add a belongsTo relationship from messages to channels, so that we can subscribe to messages using a parent subscription rather than filters.
Tasks
Finally, we need object representing the tasks being assigned by users to other users. Much like messages, we use them to store data about who the recipient is, the text of the task and its completion status.
The structure of a task object
| Key name | Type | Description |
|---|---|---|
| completed | boolean | True if recipient has completed the task |
| recipient_id | user | The user id of the recepient of the task |
| text | string | The text associated with the task |
Configuring your app
You need to do three things to have a functional app on the server side:
- Create the app;
- Set the schema;
- Create a collection.
If using the Telepat dashboard:
- Navigate to your homescreen (the '/apps' route), and click on the add button, in the upper right corner.
- Enter an app name (like 'Telepat Chat'), and press the save button (the checkmark in the upper right). But sure, why not also add an app icon, for good looks?
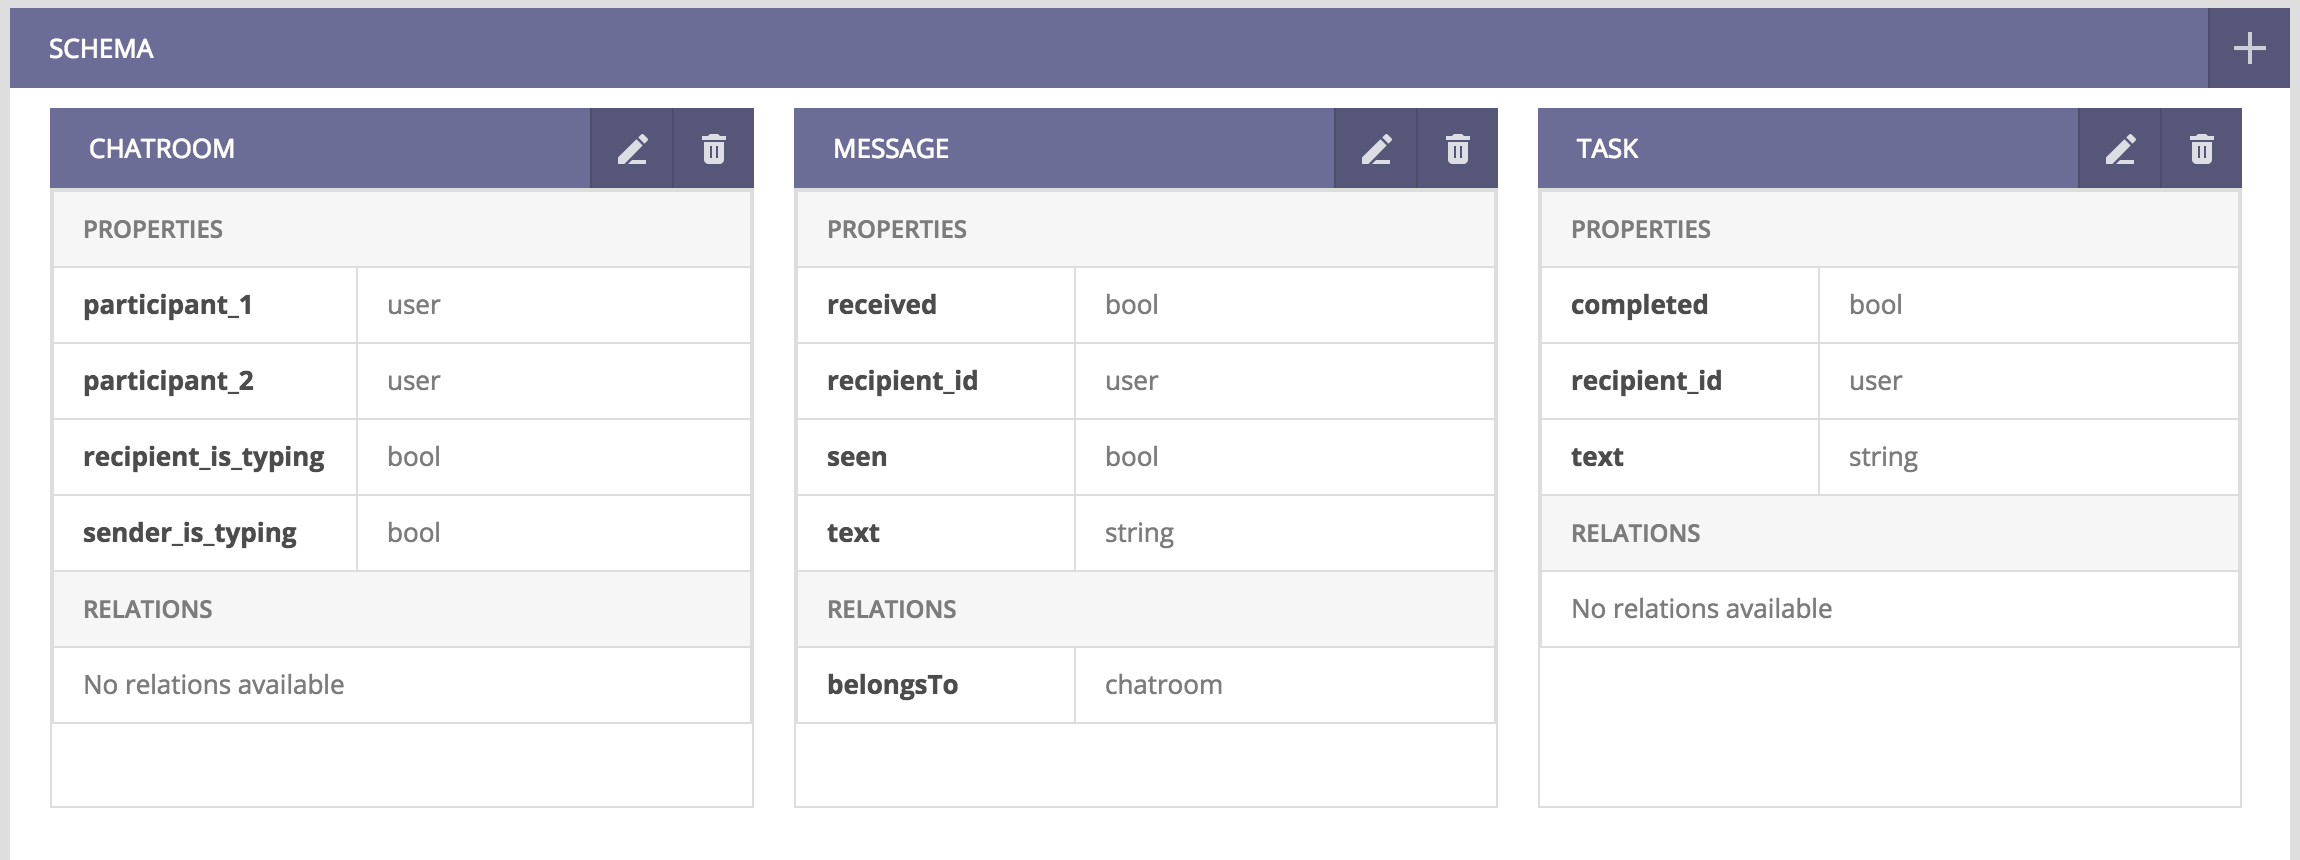
- You will be redirected to the schema page of your new app. Create the following schema:
- Go to the browse page of your app, and click the add button in the 'Collections' column.
- Type in a name for this collection, and press the save button (the checkmark in the upper right).
- Get your collection identifier:

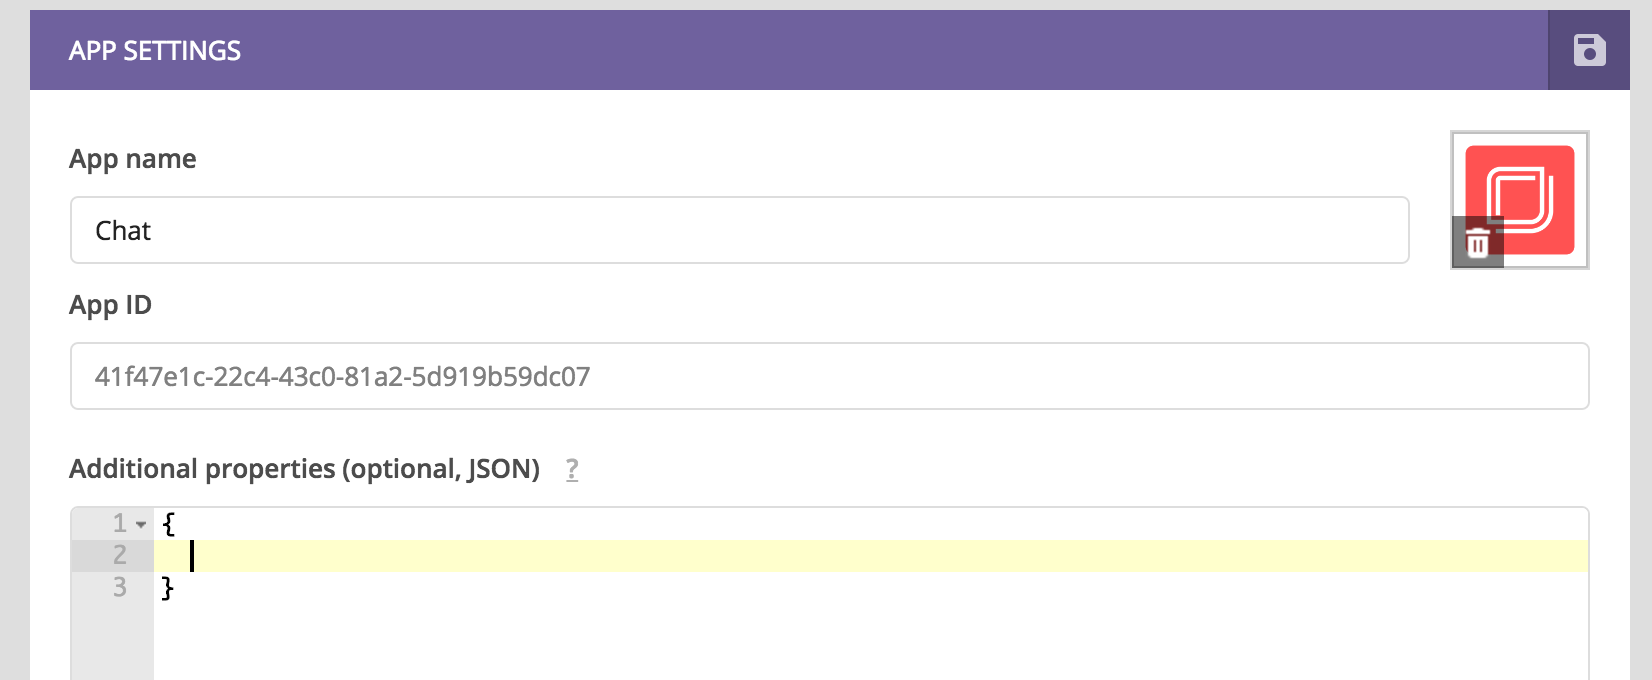
- Go to the settings page of your app, and get the app id:
- Go to the 'Manage API keys' panel of the app settings page, and get your app API key.
If running own instance
Alternatively, you can setup your app using the Telepat CLI:
telepat add app --name APP_NAME --apiKey API_KEY
telepat add context --contextName CONTEXT_NAME
telepat set schema --filename PATH_TO_SCHEMA_JSON --apiKey API_KEY
Here is the full schema object that needs to be set on the application:
{
 "chatroom":{
    "meta_read_acl":6,
    "properties":{
       "participant_1":{ "type":"user" },
       "participant_2":{ "type":"user" },
       "recipient_is_typing":{ "type":"bool" },
       "sender_is_typing":{ "type":"bool" }
    },
    "read_acl":6,
    "write_acl":6
 },
 "message":{
    "belongsTo":[{ "parentModel":"chatroom" }],
    "meta_read_acl":6,
    "properties":{
       "received":{ "type":"bool" },
       "recipient_id":{ "type":"user" },
       "seen":{ "type":"bool" },
       "text":{ "type":"string"}
    },
    "read_acl":6,
    "write_acl":6
 },
 "task":{
    "meta_read_acl":6,
    "properties":{
       "completed":{ "type":"bool" },
       "recipient_id":{ "type":"user" },
       "text":{ "type":"string" }
    },
    "read_acl":6,
    "write_acl":6
 }
}
Installing and running the demo
Clone the GitHub repository:
  git clone https://github.com/telepat-io/telepat-demo.git
  cd telepat-demo
Install npm and bower dependencies:
npm install && bower installConfigure the app. Rename
src/js/config.example.jstosrc/js/config.js, and fill in data from the Telepat server instance:var TelepatConfig = { apiKey: 'APP-API-KEY', appId: 'APP-ID', apiEndpoint: 'API-URL', socketEndpoint: 'SOCKET-URL', timerInterval: 150, collectionId: 'APP-MAIN-COLLECTION-ID', facebookAppId: '1743490645916155' };Run it using
gulp
Connecting to Telepat
One of the first things the app does is connect to the Telepat instance:
window.TelepatInstance = new Telepat();
window.TelepatInstance.setLogLevel('debug');
window.TelepatInstance.connect(TelepatConfig);
var callbackId = window.TelepatInstance.on('connect', function() {
  window.TelepatInstance.removeCallback('connect', callbackId);
  LoginController.render();
});
We're listening to the connect event, and registering a callback that we unregister on the first trigger - that is, when the client is connected. After connection succedes, we can go ahead and render the login controller.
Authentication
The Telepat SDK saves authentication tokens to local storage, so that client reloads can be done without requiring the user to log in each time. If a saved token is available, we should reauthenticate using that. If not, we should check our Facebook authentication status - if we get an authentication token back from Facebook, we can use that to log into Telepat.
if (window.TelepatInstance.user.canReauth) {
  window.TelepatInstance.user.reauth();
} else {
  FB.getLoginStatus(function(response) {
    if (response.status === 'connected') {
      //Logs the user into Telepat using FB credentials (access_token)
      window.TelepatInstance.user.loginWithFacebook(response.authResponse.accessToken);
    } else {
      $('#everything').load('login.html', null, LoginController.ready);
    }
  });
}
We also want to show the chat interface when the login is completed, so we listen for that event:
window.TelepatInstance.on('login', function() {
  ChatController.render();
});
Subscribing to messages
One of the first things the chat controller does is create three subscriptions:
Users list
First, to the application users. After getting the list of users, we can render the list of profiles in the left column. Anytime a new user is added, we update the interface by adding a new DOM element for that user.
  ChatController.usersChannel = TelepatInstance.subscribe({
    channel: {
      model: 'user'
    },
    sort: {
      name: 'asc'
    }
  }, function() {
    ChatController.updateUserList();
    ChatController.usersChannel.on('update', function(opType, userId, object) {
      if(opType == 'add')
        ChatController.insertUser(object);
    });
  });
Typing indicators
Next, a subscription to all messaging channels where the currently logged user is one of the participants.
  ChatController.ChatroomChannel = TelepatInstance.subscribe({
    channel: {
      model: 'chatroom',
      context: TelepatConfig.collectionId
    },
    filters: {
      or: [
        {
          is: {
            participant_1: TelepatInstance.user.data.id,
          }
        },
        {
          is: {
            participant_2: TelepatInstance.user.data.id,
          }
        }
      ]
    }
  });
We use channel objects to store and transmit information about which user is currently typing.
  ChatController.ChatroomChannel.on('update', function(opType, id, object, patch) {
    //we're only interested in the chatrooms where I am a participant
    if (ChatController.recipient && (object.participant_1 == ChatController.recipient.id || object.participant_2 == ChatController.recipient.id)) {
      if (opType == 'replace') {
        //changes on this field name indicate when the other user is typing
        var isTypingField = ChatController.currentChatroom.user_id == TelepatInstance.user.data.id ? 'recipient_is_typing' : 'sender_is_typing';

        if (isTypingField == patch.path) {
          if (ChatController.ChatroomChannel.objects[id][patch.path] == true) {
            // Create the dots typing indicator
          }
          else if (ChatController.ChatroomChannel.objects[id][patch.path] == false) {
            // Remove the dots typing indicator
          }
        }
      }
    }
  });
We build methods to set typing information for the current user as well. Notice that we only need to set the proper value on the channel object - the change is picked up and signaled to Telepat by the SDK.
  /**
   * sends the is typing property on the chatroom that tells when the other participant has started typing
   */
  sendIsTyping: function() {
    var isTypingField = ChatController.currentChatroom.user_id == TelepatInstance.user.data.id ? 'sender_is_typing' : 'recipient_is_typing';
    ChatController.ChatroomChannel.objects[ChatController.currentChatroom.id][isTypingField] = true;
    ChatController.isTypingTimeout = setTimeout(ChatController.clearIsTyping, 3000);
  },
  /**
   * clears this flag when at least 3 seconds have passed since the last key pressed
   */
  clearIsTyping: function() {
    var isTypingField = ChatController.currentChatroom.user_id == TelepatInstance.user.data.id ? 'sender_is_typing' : 'recipient_is_typing';
    ChatController.ChatroomChannel.objects[ChatController.currentChatroom.id][isTypingField] = false;
    clearTimeout(ChatController.isTypingTimeout);
    ChatController.isTypingTimeout = null;
  },
Unread count
Finally, we subscribe to all incoming messages, then check for the
unseenobject property to see how many unread messages we have from each user:ChatController.AllMessagesChannel = TelepatInstance.subscribe({ channel: { model: 'message', context: TelepatConfig.collectionId }, filters: { and: [ { is: { recipient_id: TelepatInstance.user.data.id, } } ] } }, function() { //iterate through all messages, check for unseen for (var messageId in ChatController.AllMessagesChannel.objects) { // ... } //update all chat badges based on the unread counts });Anytime a new message is received, we want to:
- Mark it as received (do this as soon as possible, even if the sender is not our current chat partner);
Update the unread badge count, if necessary.
  ChatController.AllMessagesChannel.on('update', function(opType, id, object, patch) {
    //set the message to received while we're online, even if we're not on the right channel
    object.received = true;
    if (!ChatController.recipient || object.user_id !== ChatController.recipient.id) {
      if (opType === 'add') {
        //there's a new message from a user different than the one we're chatting with, update the badge count
        if (!ChatController.badgeCount[object.user_id]) {
          ChatController.badgeCount[object.user_id] = 1;
        } else {
          ChatController.badgeCount[object.user_id]++;
        }
        ChatController.updateBadgeCountForUser(object.user_id);
        ChatController.newMessageSound.play();
      }
    }
  });
Chat messages
Anytime the user clicks on of the profiles in the left column, we subscribe to messages that correspond to the chatroom object shared by the two participants to the chat. After getting the ordered messages objects, we need to add them to the interface, and mark them as both delivered and seen.
  ChatController.MessagesChannel = TelepatInstance.subscribe({
    channel: {
      model: 'message',
      parent: {
        model: 'chatroom',
        id: chatroomId
      }
    },
    sort: {
      created: 'asc'
    }
  }, function() {
    //inserting messages into the DOM from the initial subscribe
    for(var msgId = 0; msgId < ChatController.MessagesChannel.objectsArray.length; msgId++) {
      var object = ChatController.MessagesChannel.objectsArray[msgId];

      if (object.user_id == TelepatInstance.user.data.id)
        ChatController.insertFromMessage(object);
      else
        ChatController.insertToMessage(object);

      object.received = true;
      object.seen = true;
    }
  });
There are two types of relevant updates to MessagesChannel objects that we need to listen to:
- New messages coming in;
Updates about existing messages becoming delivered/seen.
  ChatController.MessagesChannel.on('update', function(opType, id, message, patch) {
    if (opType == 'add') {
      //messages sent by me are also signaled here, after the create request has been processed
      if (message.user_id == TelepatInstance.user.data.id)  {
        ChatController.insertFromMessage(message);
      } //otherwise it's the from my partner
      else {
        //set this message as delivered
        ChatController.MessagesChannel.objects[id].received = true;
        ChatController.insertToMessage(message);

        //also, if the input message element is in focus, we set the message as seen
        if (document.activeElement.parentElement.id == 'message_input_container') {
          ChatController.MessagesChannel.objects[ChatController.lastHisMessageId].seen = true;
        }
      }
    } else if (opType == 'replace') {
      //this is how we capture the 'received' and 'seen' changes on each message
      if (patch.path == 'received' && ChatController.MessagesChannel.objects[id].user_id == TelepatInstance.user.data.id)
        ChatController.setMessageDelivered(id);
      else if (patch.path == 'seen' && ChatController.MessagesChannel.objects[id].user_id == TelepatInstance.user.data.id) {
        ChatController.setSeen();
      }
    }
  });
Creating a new message is really simple, just add it to the
objectsproperty of a channel, under a random, new key. The change will be picked up by the monitoring system, so the object will vanish fromobjectsfor the moment, to be re-added under the proper id when Telepat finishes processing the update and signals back to the client. We're already capturing and adding all new messages from subscribing toupdatebefore, so it boils down to:ChatController.MessagesChannel.objects['new'] = { text: textMessage, recipient_id: ChatController.recipient.id, context_id: TelepatConfig.collectionId, chatroom_id: ChatController.currentChatroom.id };
Implementing tasks
Just like with messages, we first subscribe to the tasks we need, and then we update the interface. We'll use filters for this subscription:
  TasksController[which] = TelepatInstance.subscribe({
    channel: {
      model: 'task',
      context: TelepatConfig.collectionId
    },
    filters: {
      and: [
        {
          is: {
            user_id: where == 'from' ? ChatController.recipient.id : TelepatInstance.user.data.id,
          }
        },
        {
          is: {
            recipient_id: where == 'from' ? TelepatInstance.user.data.id : ChatController.recipient.id
          }
        }
      ]
    }
  }, function() {
    for(var id in TasksController[which].objects) {
      var task = TasksController[which].objects[id];

      TasksController.insertTask(task, where);
    }
  });
We listen for update events on the channel, and we filter out 3 possible operations:
- A task property has been replaced, and that can be the
completedkey signaling a task has been completed - A task has been added, and the UI needs updating
A task has been deleted, and the UI needs updating
TasksController[which].on('update', function(opType, id, object, patch) {
  if (opType == 'replace') {
    //this happens when we click on the completed checkbox
    if (patch.path == 'completed') {
      // Update UI to indicate complete task
    }
  } else if (opType == 'add') {
    // Insert the new task in the UI
  //when tasks are deleted
  } else if (opType == 'delete') {
    // Remove task from UI
  }
});
- A task property has been replaced, and that can be the
Adding a new task is as easy as adding a new message:
  TasksController.TheirTasksChannel.objects['new'] = {
    text: taskText,
    completed: false,
    recipient_id: ChatController.recipient.id
  };
Completing a task means setting its
completedproperty to true. The change will be propagated by the SDK and Telepat.TasksController.MyTasksChannel.objects[id].completed = true;And removing a task means deleting its object from the collection.
delete TasksController.MyTasksChannel.objects[id];